
Windows 7 is a Mater piece from Microsoft,I have already posted that how windows 7 is the Successor than other Operating system.Windows 7 is popular because of its look and feel.It comes from its ground breaking Themes.Then how to create a theme for Windows 7 with all your Photos and Styles.Customize your own Theme with your personal photos and colors and everything you want.


What you need to create Windows 7 themes Nothing,yes just nothing, All you need is Windows 7 Installed PC.If Windows 7 is installed in your PC then you are ready.This is very simple and easy process,follow the step-by-step tutorial guide below and your Own Windows 7 theme is ready.
Steps To Create Your Own Windows 7 Themes
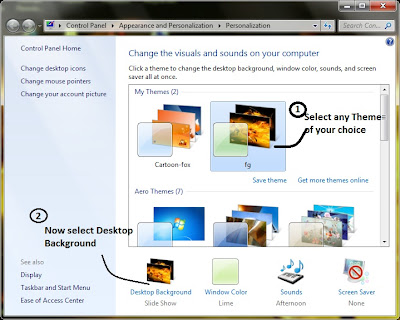
1. Right Click on your Desktop and select Personalize Option from the the menu.
2. Now a new window will Open with all your Default Themes,Select any theme in all of them.
3. Now you will see an option bellow to that Windows as Desktop Background,just Click on it. See the pictorial image below
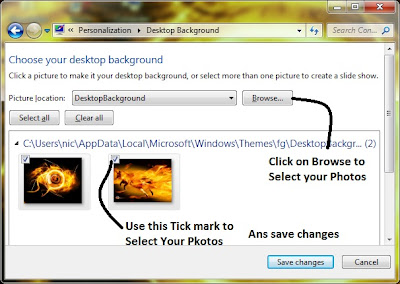
4. Now another new window will Open,Where you can find the images of your Theme.You can add your favorite photos there by Click on Browse and show the path of the Folder and Click OK.Now all the photos in the Folder will be retrieved in to the Window.After that select the images you want to add. You will see a Check box above to every image.Just tick on it and finally Save Changes. See the bellow image.And also you can select the time between image to image there
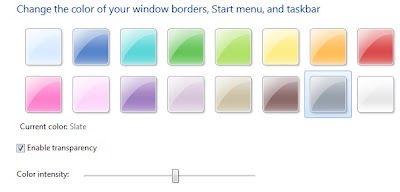
5. Now the Window Color Palate,You can use any color but I suggest you always use the Color which are relevant and similar to your images.
6. To select Colors you will see an option Windows Colors .Just click and select the color of your wish,you can even make a transparent option by Drag the Slider and save changes.See the tutorial image below
7) Now your Windows 7 Theme is ready ,but remember it is saved as Unknown Theme , To give a name to that theme Right Click on it and select Save Theme. Now it is prompted for Name give any name of your choice and save.But you can use this but you can’t share it with others.
To share your custom Windows 7 theme and make it as a .themepack file,Jut right click on the Theme and select Save theme to Share with other . Now it is asking for saving location,just give any location like Desktop ,and save.
To share your custom Windows 7 theme and make it as a .themepack file,Jut right click on the Theme and select Save theme to Share with other . Now it is asking for saving location,just give any location like Desktop ,and save.
8) Your brand new Windows 7 Theme is ready for use and Share with others on your Desktop.
This is how you can create your own windows 7 theme for free without any third party applications,before leaving don’t forget to Subscribe to My Newsletters so that you can always have first class free mobile and computer tutorial sent directly to your email address<
This is how you can create your own windows 7 theme for free without any third party applications,before leaving don’t forget to Subscribe to My Newsletters so that you can always have first class free mobile and computer tutorial sent directly to your email address<
No comments:
Post a Comment