kindluv

Friday 7 December 2012

How To Extend Your MTN BIS To 6 Months Without Paying A Dim


Do You know that You Can EXTEND YOUR MTN BIS TO
6MONTHS?
 No? Well, that was what Came to my Mind 2 mounth Ago when One of my Course mate told me about this Lovely Tip, I never believe it not Until Yesterday that I confirmed it.
My BIS was Expected to Expire Last 2 weeks but I am Very Suprise Cos I’m enable to everything on my BB without any BIS…
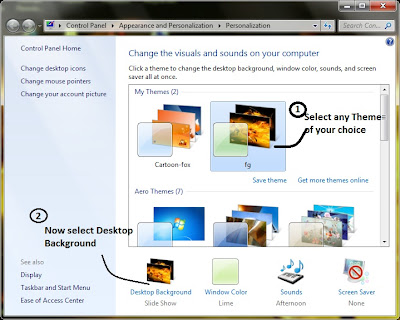
HOW TO EXTEND YOUR MTN BIS TO 6MONTHS
Reset date on Your Blackberry to
6months ahead any time You want to Subscribe for New BIS.. then recharge N1,500 and Subscribe for MTN MONTHLY BIS.
=> After that, remove Your Blackberry. battery and insert again, set Your normal time and flex!!
My Friend is Making Cool cash From this lovely Tips by turning N1,700 to N4,000 on Every Sim… You ask me How?? All he did is purchasing a new Sim Card @ the rate of N200 and buy MTN Airtime @ the rate of N1,500 making N1,700 then Follow above Tips and Sell the Sim to People that Need it!
::.Don’t Just Come Here to Copy/Read Our Tutorial without Clicking on Share& Tweet Link.::

How To Delete Your BlackBerry Address Book/Contacts


DELETE YOUR ENTIRE BLACKBERRY CONTACTS USING BLACKBERRY DESKTOP SOFTWARE
Download and Install the latest version of the BlackBerry Desktop Manager. (I’m using version 7.1.0.32)
Connect your BlackBerry device to your computer via the usb port and then launch BDM.
Click on Device and then Delete Data.
Click on Selected Data and select Address Book and Address Book – All. Be sure to select the option to backup your data before initiating the delete process.
Sit back and wait for the process to be done.

DSTV Problem Of Channels Not Displaying After Subscription Solved


I noticed that after renewing my DSTV subscription after my subscription was off for some days, and after paying I went out without confirming if all the channels are showing, I was thinking if it will come back in a couple of hours but still nothing came up.
And what was showing was only the free stations and to go back to complain was another expense and some people who face this same problem and the paid through banks, ATM and DSTv centers.
I discovered or learnt a new way of reporting errors to DSTv without calling them or going back.
How To Solve This Problem
All you have to do is send a simple text message
send your RE DSTv decoder number to 30333
eg: RE- 123456789023 to 30333
This will works for all networks and instantly you will receive a response from them and in a short period of time your channels will be back.

UNLOCKING NETWORK LOCKED BLACKBERRY FOR FREE!


In continuation of the freebies i started last week, this week i will be releasing a step by step guide on how to unlock network-locked blackberry.
Due to the recent frenzy for blackberry and its data management, more people are being lured into its use since it offers one the opportunity to use a smart phone and still pay less for data due to its friendly data packages.
This have increased the market base for fairly used blackberry phones especially those used in the western word, where most phones are used on contracts and therefore they are locked to that particular network. There is a great market for those phones since they come very cheap, the only challenge mostly is how to unlock it and use it on other gsm networks.
Normally one need to pay the company to unlock these phones. But the good news today is i will be giving u a software and steps to unlock your blackberry phones for FREE!
STEPS:
1. Download the BB unlock code calculator HERE
2. Extract and open it.
3. Put your BB imei number and mep number as seen below.

4. Click calculate and you will get this:
5. Copy out the MEP2. This is your unlock code.
6. Put your new sim into the BB phone, switch it on and then input that MEP2 code you copied and OK!
7. Congratulations your BB is now free!

How to Transfer MB on Airtel Network


Saw a Thread on How to Transfer MB on Etisalat, Take the Full List for Airtel MB Transfer Code.
To Transfer 10MB:- Dial *141*712*11*recipient number#
To Transfer 25MB:- Dial *141*712*9*recipient number#
To Transfer 60MB:- Dial *141*712*4*recipient number#
To understand more, Please dial *141*1# and follow the voice prompts to get more info about the bundle transfer.
Note:- 100 will be deducted for every MB Transferred.

How to Transfer Etisalat MB to Another Phone


Guess Many People really need to know How to Transfer MB to other Phone on Etisalat Network? Just Decided to Drop the How to.
Want to transfer Etisalat MB to another Phone? Its very Simple, Just Dial *229*Phone No*Amount of mb # e.g Dial*229*08099224465*40#. This will send 40MB to the Number.
I will be Dropping that for other Network Soonest, Don’t Forget to Create a New Thread with Good Info on Infoloaded Today.
Don’t Forget to Drop your comment & Use the Like or Share Button.

Step-by-Step Guide On How To Create & Customize Your Own Windows 7 (OS) Theme

Windows 7 is a Mater piece from Microsoft,I have already posted that how windows 7 is the Successor than other Operating system.Windows 7 is popular because of its look and feel.It comes from its ground breaking Themes.Then how to create a theme for Windows 7 with all your Photos and Styles.Customize your own Theme with your personal photos and colors and everything you want.

What you need to create Windows 7 themes Nothing,yes just nothing, All you need is Windows 7 Installed PC.If Windows 7 is installed in your PC then you are ready.This is very simple and easy process,follow the step-by-step tutorial guide below and your Own Windows 7 theme is ready.
Steps To Create Your Own Windows 7 Themes
1. Right Click on your Desktop and select Personalize Option from the the menu.
2. Now a new window will Open with all your Default Themes,Select any theme in all of them.
3. Now you will see an option bellow to that Windows as Desktop Background,just Click on it. See the pictorial image below
4. Now another new window will Open,Where you can find the images of your Theme.You can add your favorite photos there by Click on Browse and show the path of the Folder and Click OK.Now all the photos in the Folder will be retrieved in to the Window.After that select the images you want to add. You will see a Check box above to every image.Just tick on it and finally Save Changes. See the bellow image.And also you can select the time between image to image there
5. Now the Window Color Palate,You can use any color but I suggest you always use the Color which are relevant and similar to your images.
6. To select Colors you will see an option Windows Colors .Just click and select the color of your wish,you can even make a transparent option by Drag the Slider and save changes.See the tutorial image below
7) Now your Windows 7 Theme is ready ,but remember it is saved as Unknown Theme , To give a name to that theme Right Click on it and select Save Theme. Now it is prompted for Name give any name of your choice and save.But you can use this but you can’t share it with others.
To share your custom Windows 7 theme and make it as a .themepack file,Jut right click on the Theme and select Save theme to Share with other . Now it is asking for saving location,just give any location like Desktop ,and save.
8) Your brand new Windows 7 Theme is ready for use and Share with others on your Desktop.
This is how you can create your own windows 7 theme for free without any third party applications,before leaving don’t forget to Subscribe to My Newsletters so that you can always have first class free mobile and computer tutorial sent directly to your email address<